

Chisel de Jaime Pillora una herramienta para crear túneles TCP sobre HTTP y, para evadir firewalls y pivotar hacia la red interna.
Se trata de una herramienta muy similar a Crowbar pero que Chisel mejora considerablemente su rendimiento. Sus principales características son:
– Fácil de usar
– Ofrece buen rendimiento
– Cifra las conexiones mediante crypto/ssh
– Permite establecer autenticación para la conexión, mediante un fichero de config en la parte cliente y mediante fingerprint en la parte del servidor
– Realiza auto-reconexión del cliente
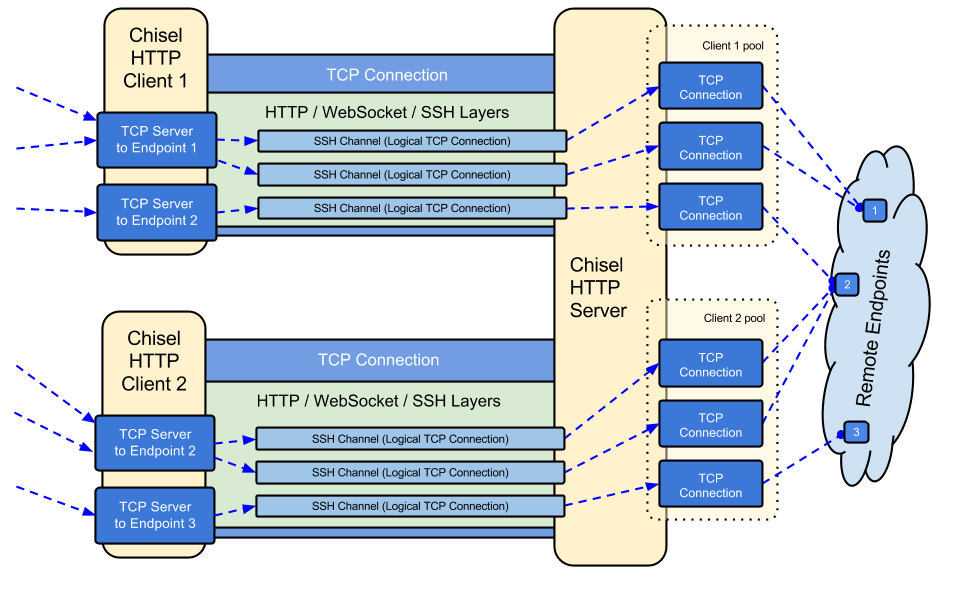
– El cliente puede crear múltiples tunnel endpoints sobre la misma conexión TCP
– El servidor puede actuar opcionalmente como proxy inverso
Instalación
Chisel está escrito en Go (golang) por lo que lo primero que deberemos hacer, si no lo tenemos ya, es instalarlo y configurar el GOPATH:
apt-get install go-lang
mkdir ~/.go
echo “GOPATH=$HOME/.go” >> ~/.bashrc
echo “export GOPATH” >> ~/.bashrc
echo “PATH=\$PATH:\$GOPATH/bin # Add GOPATH/bin to PATH for scripting” >> ~/.bashrc
source ~/.bashrc
Luego para instalarlo tendremos dos opciones, o crear los binarios a partir de la fuente:
$ go get -v github.com/jpillora/chisel
O ejecutarlo directamente desde un contenedor docker:
$ docker run –rm -it jpillora/chisel –help
Uso
Su uso es muy sencillo. Pueden ver las opciones disponibles llamando al parámetro –help.
$ chisel server –help
 Usage: chisel server [options]

    Options:

      --host, Defines the HTTP listening host – the network interface
      (defaults to 0.0.0.0).

      --port, Defines the HTTP listening port (defaults to 8080).

      --key, An optional string to seed the generation of a ECDSA public
      and private key pair. All commications will be secured using this
      key pair. Share this fingerprint with clients to enable detection
      of man-in-the-middle attacks.

      --authfile, An optional path to a users.json file. This file should
      be an object with users defined like:
        "<user:pass>": ["<addr-regex>","<addr-regex>"]
        when <user> connects, their <pass> will be verified and then
        each of the remote addresses will be compared against the list
        of address regular expressions for a match. Addresses will
        always come in the form "<host/ip>:<port>".

      --proxy, Specifies the default proxy target to use when chisel
      receives a normal HTTP request.

      -v, Enable verbose logging

      --help, This help text

    Read more:
https://github.com/jpillora/chiselUsage: chisel client [options] <server> <remote> [remote] [remote] ...
server is the URL to the chisel server.
remotes are remote connections tunnelled through the server, each of
which come in the form:
<local-host>:<local-port>:<remote-host>:<remote-port>
* remote-port is required.
* local-port defaults to remote-port.
* local-host defaults to 0.0.0.0 (all interfaces).
* remote-host defaults to 0.0.0.0 (server localhost).
example remotes
3000
example.com:3000
3000:google.com:80
192.168.0.5:3000:google.com:80
Options:
--fingerprint, An optional fingerprint (server authentication)
string to compare against the server's public key. You may provide
just a prefix of the key or the entire string. Fingerprint
mismatches will close the connection.
--auth, An optional username and password (client authentication)
in the form: "<user>:<pass>". These credentials are compared to
the credentials inside the server's --authfile.
--keepalive, An optional keepalive interval. Since the underlying
transport is HTTP, in many instances we'll be traversing through
proxies, often these proxies will close idle connections. You must
specify a time with a unit, for example '30s' or '2m'. Defaults
to '0s' (disabled).
-v, Enable verbose logging
--help, This help text
Read more:
https://github.com/jpillora/chiselDemo
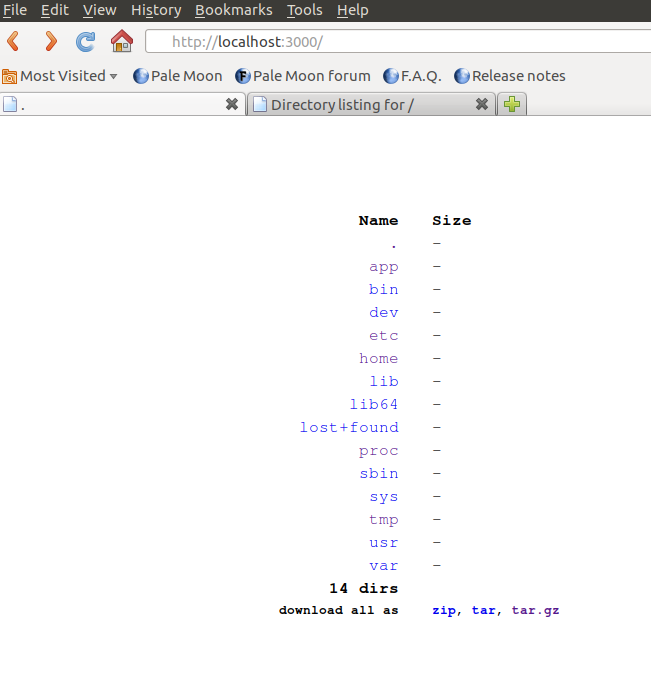
Tienen también una demo en https://chisel-demo.herokuapp.com/. En dicho servidor está corriendo el servidor Chisel como un proxy inverso hacia la web http://example.com, pueden comprobarlo simplemente visitando la página mediante el navegador:

Pero la app de demo también está corriendo un simple file server en puerto :3000 el cual es inaccesible debido a que el firewall de Heroku (PaaS) lo está denegando.
Sin embargo si usamos el cliente Chisel podemos tunelizar localhost:3000 contra el ‘localhost:3000’ del servidor.
$ chisel client https://chisel-demo.herokuapp.com 3000
Ahora si configuramos el navegador para que utilice como proxy localhost:3000 y visitamos http://localhost:3000 podremos acceder a la app de demo y ver el listado de directorios:
De forma similar podemos hacer la prueba en local. Primero levantamos el servidor Chisel:
$ chisel server –port 8008 –proxy http://example.com
2017/01/10 22:00:56 server: Fingerprint 5b:b3:64:15:86:d1:bc:29:1e:f3:1d:ec:8f:c2:ae:bb
2017/01/10 22:00:56 server: Default proxy enabled
2017/01/10 22:00:56 server: Listening on 8008…
A continuación iniciamos un webserver de pruebas con Python para la PoC:
$ python -m SimpleHTTPServer 12345
Serving HTTP on 0.0.0.0 port 12345 …
127.0.0.1 – – [10/Jan/2017 22:14:44] “GET / HTTP/1.1” 200 –
127.0.0.1 – – [10/Jan/2017 22:14:44] code 404, message File not found
127.0.0.1 – – [10/Jan/2017 22:14:44] “GET /favicon.ico HTTP/1.1” 404 –
Para posteriormente ejecutar el cliente Chisel y crear un túnel por el cuál reenviaremos el tráfico hacia dicho servidor de pruebas:
$ chisel client localhost:8008 4000:localhost:12345
2017/01/10 22:13:27 client: Connecting to ws://localhost:8008
2017/01/10 22:13:27 client: Fingerprint 5b:3b:64:45:86:c1:bb:49:1e:f3:1d:ec:8f:c2:ae:bb
2017/01/10 22:13:27 client: Connected (Latency 355.132µs)

Proyecto: https://github.com/jpillora/chisel
Shadow77
#HackNic